Details about Positioning
Understanding PDF coordinates is essential for precise content placement. This guide explains how PDF positioning works in PDFDancer.
PDF Coordinate System
PDF uses a Cartesian coordinate system with the origin at the bottom-left corner of the page:
- X-axis: Increases from left (0) to right
- Y-axis: Increases from bottom (0) to top
- Units: PDF points (1 point = 1/72 inch)
Common Page Sizes
- Letter (US): 612 × 792 points (8.5" × 11")
- A4: 595 × 842 points (210mm × 297mm)
- Legal: 612 × 1008 points (8.5" × 14")
Visual Guide to PDF Coordinates
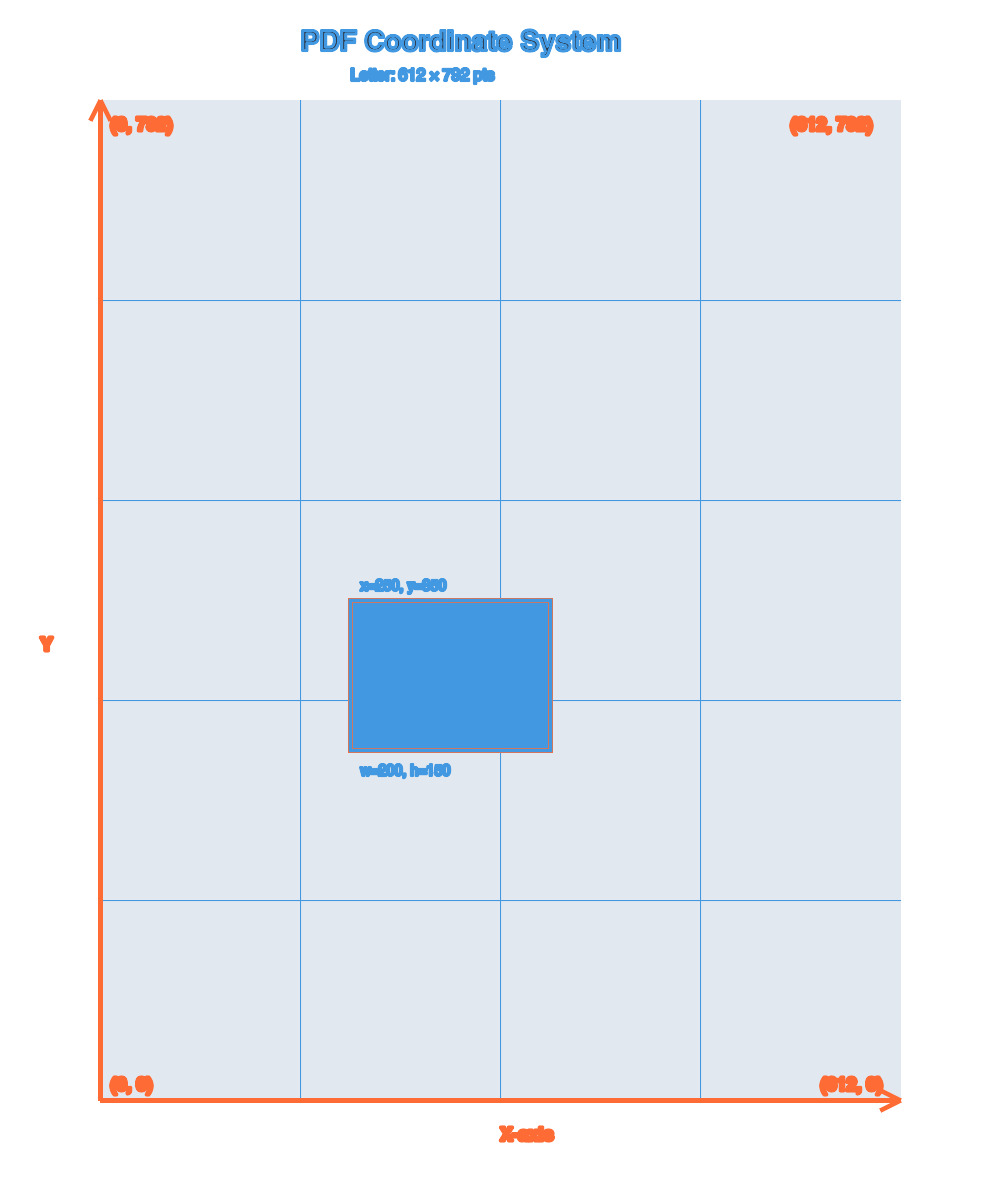
Image: positioning-visual-guide.png
Shows: Complete PDF page with grid overlay, all four corners annotated with coordinates, common page sizes shown with dimensions, bounding rectangles with labeled properties (x, y, width, height), ruler/scale indicator, and examples of elements at different positions.
Details: See /static/img/placeholders/README.md for full specifications.
Understanding Coordinates
- Python
- TypeScript
- Java
from pdfdancer import PDFDancer

with PDFDancer.open("document.pdf") as pdf:
    # Bottom-left corner (0, 0)
    pdf.new_paragraph() \
        .text("Bottom Left") \
        .font("Helvetica", 10) \
        .at(page_number=1, x=10, y=10) \
        .add()

    # Top-left corner (for Letter size: 792pt height)
    pdf.new_paragraph() \
        .text("Top Left") \
        .font("Helvetica", 10) \
        .at(page_number=1, x=10, y=782) \
        .add()

    # Center of page (for Letter size: 612×792)
    pdf.new_paragraph() \
        .text("Center") \
        .font("Helvetica", 10) \
        .at(page_number=1, x=306, y=396) \
        .add()

    # Top-right corner
    pdf.new_paragraph() \
        .text("Top Right") \
        .font("Helvetica", 10) \
        .at(page_number=1, x=552, y=782) \
        .add()

    # Bottom-right corner
    pdf.new_paragraph() \
        .text("Bottom Right") \
        .font("Helvetica", 10) \
        .at(page_number=1, x=552, y=10) \
        .add()

    pdf.save("output.pdf")
import { PDFDancer } from 'pdfdancer-client-typescript';

const pdf = await PDFDancer.open('document.pdf');
const page = pdf.page(1);

// Bottom-left corner (0, 0)
await page.newParagraph()
  .text('Bottom Left')
  .font('Helvetica', 10)
  .at(10, 10)
  .apply();

// Top-left corner (for Letter size: 792pt height)
await page.newParagraph()
  .text('Top Left')
  .font('Helvetica', 10)
  .at(10, 782)
  .apply();

// Center of page (for Letter size: 612×792)
await page.newParagraph()
  .text('Center')
  .font('Helvetica', 10)
  .at(306, 396)
  .apply();

// Top-right corner
await page.newParagraph()
  .text('Top Right')
  .font('Helvetica', 10)
  .at(552, 782)
  .apply();

// Bottom-right corner
await page.newParagraph()
  .text('Bottom Right')
  .font('Helvetica', 10)
  .at(552, 10)
  .apply();

await pdf.save('output.pdf');
PDFDancer pdf = PDFDancer.createSession("document.pdf");

// Bottom-left corner (0, 0)
pdf.newParagraph()
    .text("Bottom Left")
    .font("Helvetica", 10)
    .at(1, 10, 10)
    .add();

// Top-left corner (for Letter size: 792pt height)
pdf.newParagraph()
    .text("Top Left")
    .font("Helvetica", 10)
    .at(1, 10, 782)
    .add();

// Center of page (for Letter size: 612×792)
pdf.newParagraph()
    .text("Center")
    .font("Helvetica", 10)
    .at(1, 306, 396)
    .add();

// Top-right corner
pdf.newParagraph()
    .text("Top Right")
    .font("Helvetica", 10)
    .at(1, 552, 782)
    .add();

// Bottom-right corner
pdf.newParagraph()
    .text("Bottom Right")
    .font("Helvetica", 10)
    .at(1, 552, 10)
    .add();

pdf.save("output.pdf");
Working with Position Objects
Position objects help you work with coordinates and bounding rectangles.
- Python
- TypeScript
- Java
from pdfdancer import Position, PositionMode

# Create position at specific coordinates
position = Position.at_page_coordinates(page=0, x=100, y=200)

# Create position with bounding rectangle
position = Position(
    page_number=1,
    bounding_rect={"x": 100, "y": 200, "width": 50, "height": 30},
    mode=PositionMode.INTERSECT
)

# Use position for selection
with PDFDancer.open("document.pdf") as pdf:
    paragraphs = pdf.select_paragraphs_at(position)
import { Position, PositionMode } from 'pdfdancer-client-typescript';

// Create position at specific coordinates
const position = Position.atPageCoordinates(0, 100, 200);

// Access position properties
const x = position.getX();
const y = position.getY();
const page = position.getPageNumber();

// Use position for selection
const paragraphs = await pdf.page(1).selectParagraphsAt(x!, y!);
import com.tfc.pdf.pdfdancer.api.common.model.*;

PDFDancer pdf = PDFDancer.createSession("document.pdf");

// Get position at specific coordinates
Position position = pdf.page(1).selectParagraphsAt(100, 200).get(0).getPosition();

// Access position properties
Double x = position.getX();
Double y = position.getY();

// Use position for selection
List<TextParagraphReference> paragraphs = pdf.page(1).selectParagraphsAt(x, y);
Bounding Rectangles
Every PDF element has a bounding rectangle that defines its position and size.
- Python
- TypeScript
- Java
from pdfdancer import PDFDancer

with PDFDancer.open("document.pdf") as pdf:
    paragraphs = pdf.page(1).select_paragraphs()

    for para in paragraphs:
        rect = para.position.bounding_rect
        print(f"Paragraph at: x={rect['x']}, y={rect['y']}")
        print(f"  Size: width={rect['width']}, height={rect['height']}")
const pdf = await PDFDancer.open('document.pdf');
const paragraphs = await pdf.page(1).selectParagraphs();

for (const para of paragraphs) {
  const rect = para.position.boundingRect;
  console.log(`Paragraph at: x=${rect?.x}, y=${rect?.y}`);
  console.log(`  Size: width=${rect?.width}, height=${rect?.height}`);
}
import com.tfc.pdf.pdfdancer.api.common.model.*;
import java.util.List;

PDFDancer pdf = PDFDancer.createSession("document.pdf");
List<TextParagraphReference> paragraphs = pdf.page(1).selectParagraphs();

for (TextParagraphReference para : paragraphs) {
    Position pos = para.getPosition();
    System.out.println("Paragraph at: x=" + pos.getX() + ", y=" + pos.getY());
}
Visual Example: Bounding Rectangles
Understanding bounding rectangles is crucial for precise element positioning:
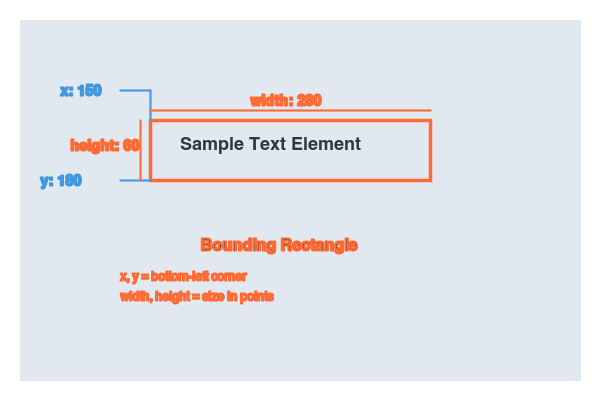
Image: bounding-rect-example.png
Shows: Zoomed-in view of a text element or shape with bounding rectangle clearly shown. Label all four properties: x (left edge), y (bottom edge), width, height. Use different colors for each dimension and include actual coordinate values as labels.
Details: See /static/img/placeholders/README.md for full specifications.
Common Positioning Patterns
Margins and Safe Areas
- Python
- TypeScript
- Java
from pdfdancer import PDFDancer

# Define margins (in points)
LEFT_MARGIN = 72    # 1 inch
RIGHT_MARGIN = 72   # 1 inch
TOP_MARGIN = 72     # 1 inch
BOTTOM_MARGIN = 72  # 1 inch

PAGE_WIDTH = 612    # Letter width
PAGE_HEIGHT = 792   # Letter height

with PDFDancer.open("document.pdf") as pdf:
    # Content within margins
    pdf.new_paragraph() \
        .text("Safe content area") \
        .at(page_number=1, x=LEFT_MARGIN, y=PAGE_HEIGHT - TOP_MARGIN) \
        .add()

    pdf.save("output.pdf")
// Define margins (in points)
const LEFT_MARGIN = 72;    // 1 inch
const RIGHT_MARGIN = 72;   // 1 inch
const TOP_MARGIN = 72;     // 1 inch
const BOTTOM_MARGIN = 72;  // 1 inch

const PAGE_WIDTH = 612;    // Letter width
const PAGE_HEIGHT = 792;   // Letter height

const pdf = await PDFDancer.open('document.pdf');

// Content within margins
await pdf.page(1).newParagraph()
  .text('Safe content area')
  .at(LEFT_MARGIN, PAGE_HEIGHT - TOP_MARGIN)
  .apply();

await pdf.save('output.pdf');
// Define margins (in points)
final int LEFT_MARGIN = 72;    // 1 inch
final int RIGHT_MARGIN = 72;   // 1 inch
final int TOP_MARGIN = 72;     // 1 inch
final int BOTTOM_MARGIN = 72;  // 1 inch

final int PAGE_WIDTH = 612;    // Letter width
final int PAGE_HEIGHT = 792;   // Letter height

PDFDancer pdf = PDFDancer.createSession("document.pdf");

// Content within margins
pdf.newParagraph()
    .text("Safe content area")
    .at(0, LEFT_MARGIN, PAGE_HEIGHT - TOP_MARGIN)
    .add();

pdf.save("output.pdf");
Next Steps
- Working with Text – Apply positioning to text elements
- Working with Images – Position images precisely
- Cookbook – See complete working examples